

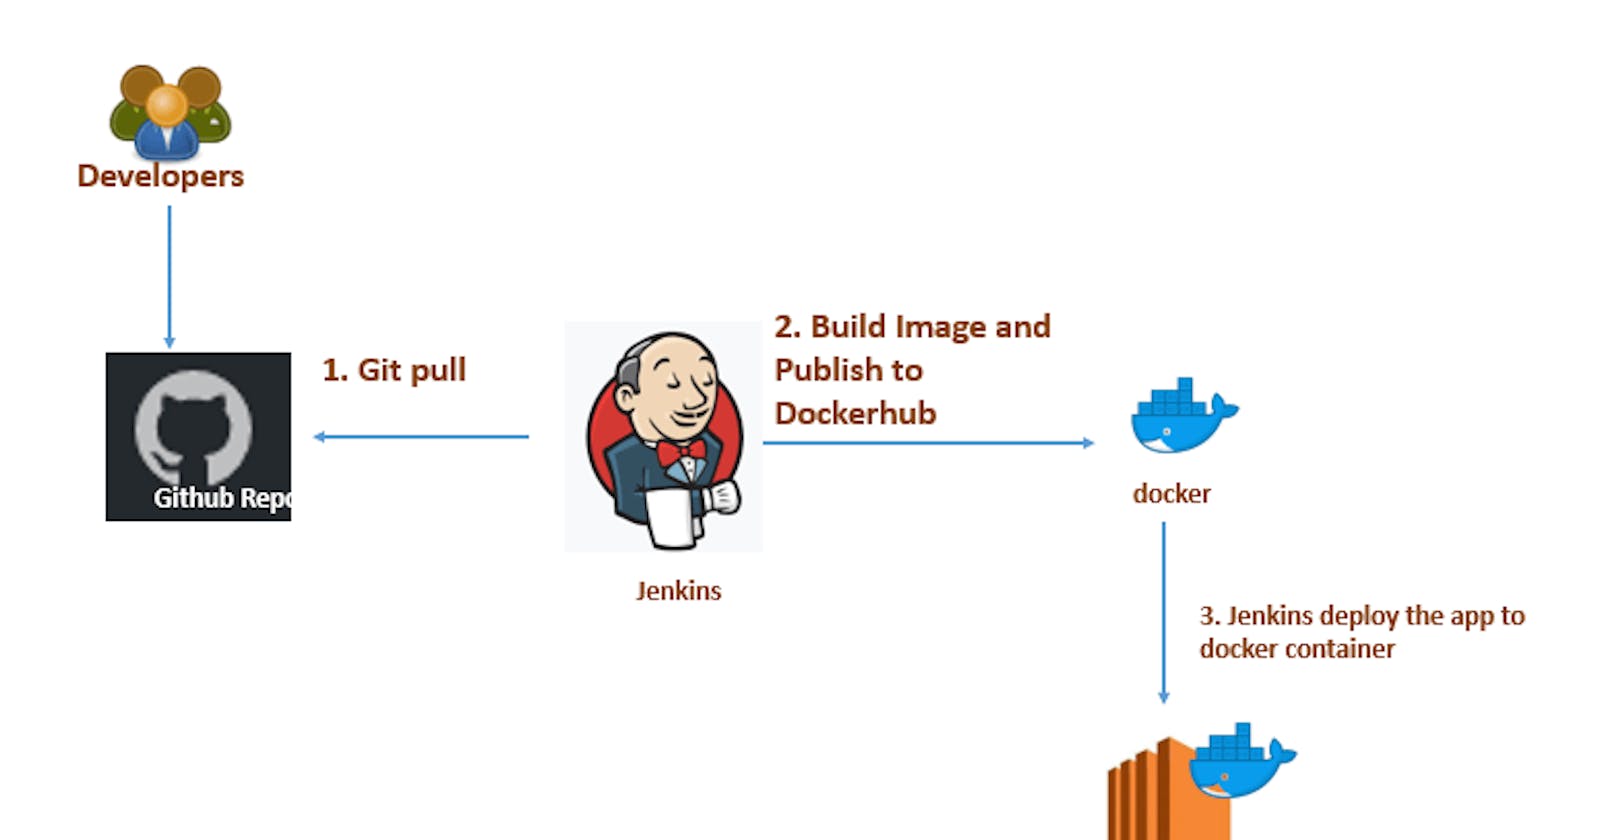


In this article, we'll go through the steps of building a CI/CD pipeline for a frontend application using the following tools:
- Github - source code management
- Docker & Docker hub
- NPM
- Jenkins
- Aws EC2
- Digital Ocean
- Terraform
Step 1: Set up a Jenkins as a container on a Digital Ocean droplet.
Jenkins is an open-source automation server that automates repetitive tasks in CI/CD.
- To get started register for a digital ocean account: digitalocean.com
create a Server (Droplet) on DigitalOcean select the following to create the server:
- An image - Ubuntu: the Lts tag
- Plan - 4GB 2 AMD CPUs
- Datacenter region - (preferably one close to your location)
- Authentication method - (ssh keys) and copy your public key to Digital Ocean. follow this link to create ssh keys
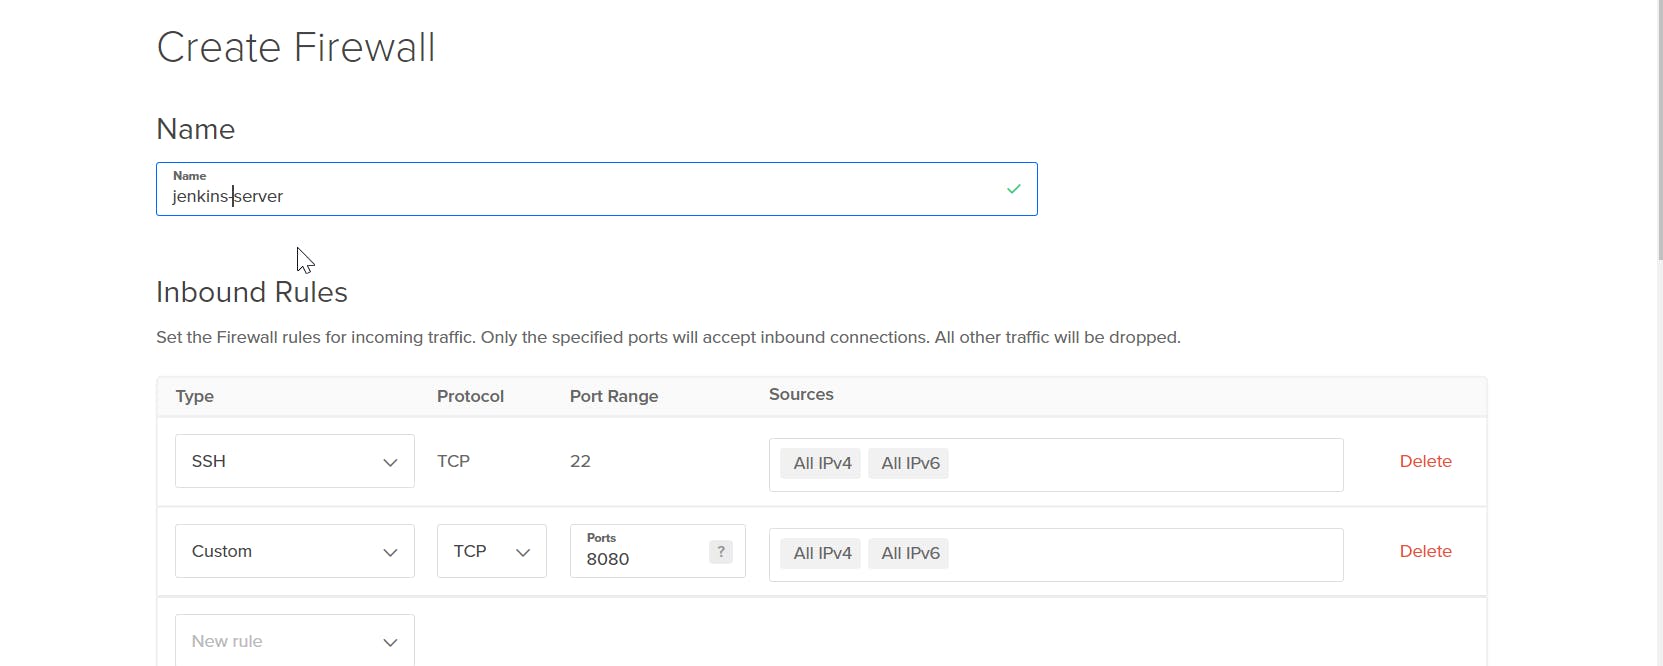
Configure Firewall Rules to open port 22 and port 8080 for our new server
Click on the newly created server and look for the networking tab on the left
SSH into the created Digital Ocean Server.
ssh -i [location of the private key] root@server public ip

Install Docker on DigitalOcean Droplet
       sudo apt-get update
       sudo apt install -y docker.io
Start Jenkins Docker container with named volume
docker run -p 8080:8080 -p 50000:50000 -d \ -v jenkins_home:/var/jenkins_home \ -v /var/run/docker.sock:/var/run/docker.sock \ -v $(which docker):/usr/bin/docker jenkins/jenkins:lts- Access the Jenkins server on the browser using the server's public IP and the port Jenkins is running on - 8080
#example
http://143.198.xx.xxx:8080/
After a successful installation of Jenkins in the Docker container, you should see a screen similar to the one below that will prompt you for an administrator password
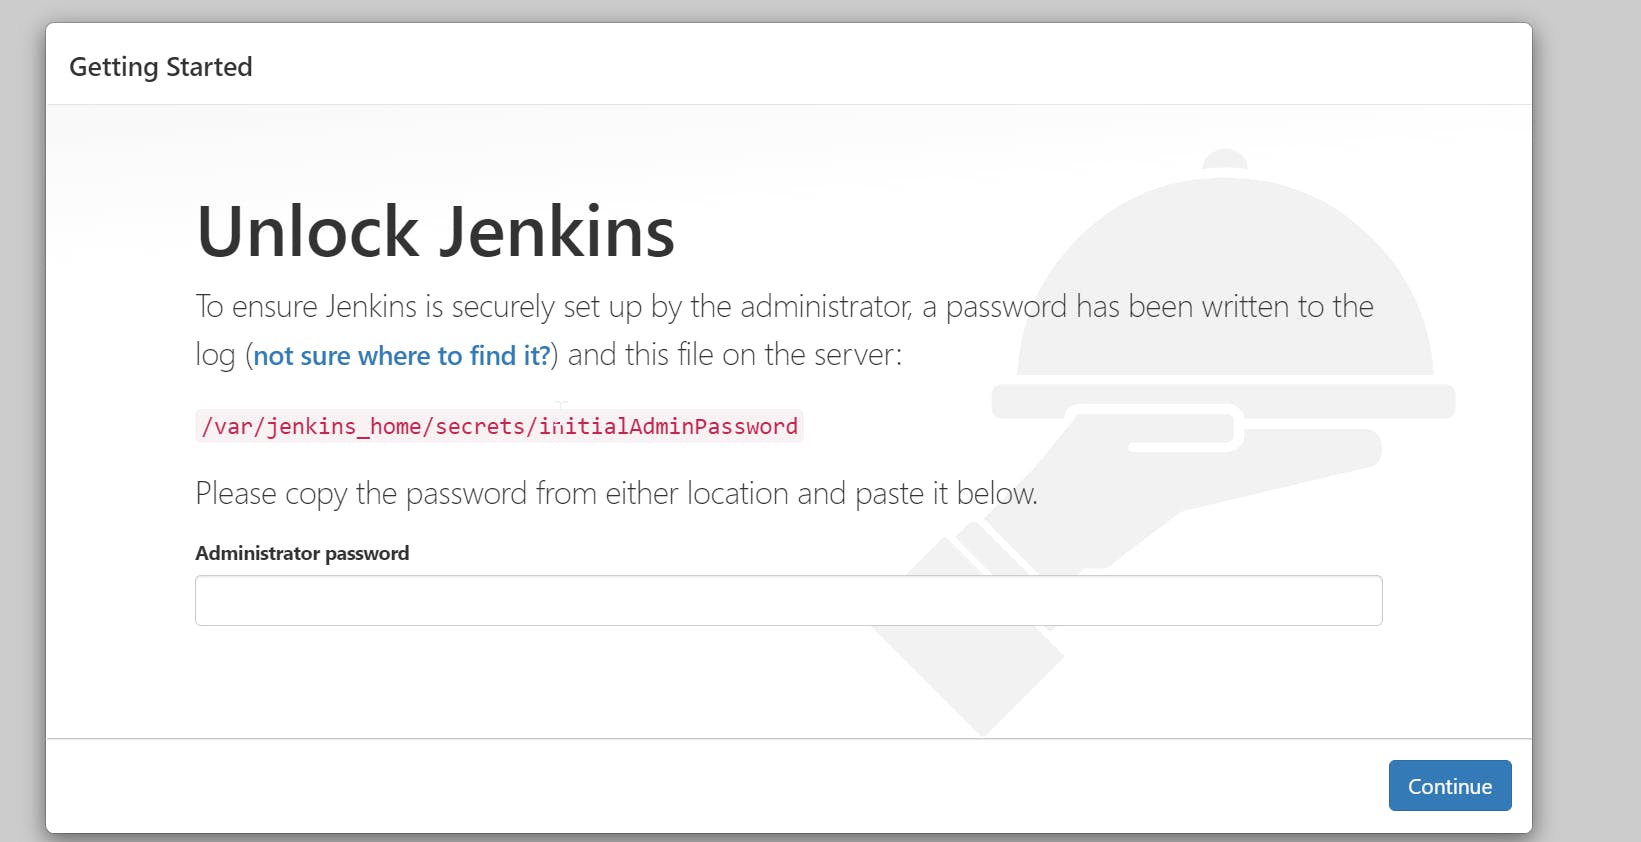
#use this command to get the initialAdminPassword
cat /var/lib/docker/volumes/jenkins_home/_data/secrets/initialAdminPassword
 copy the password and login into jenkins
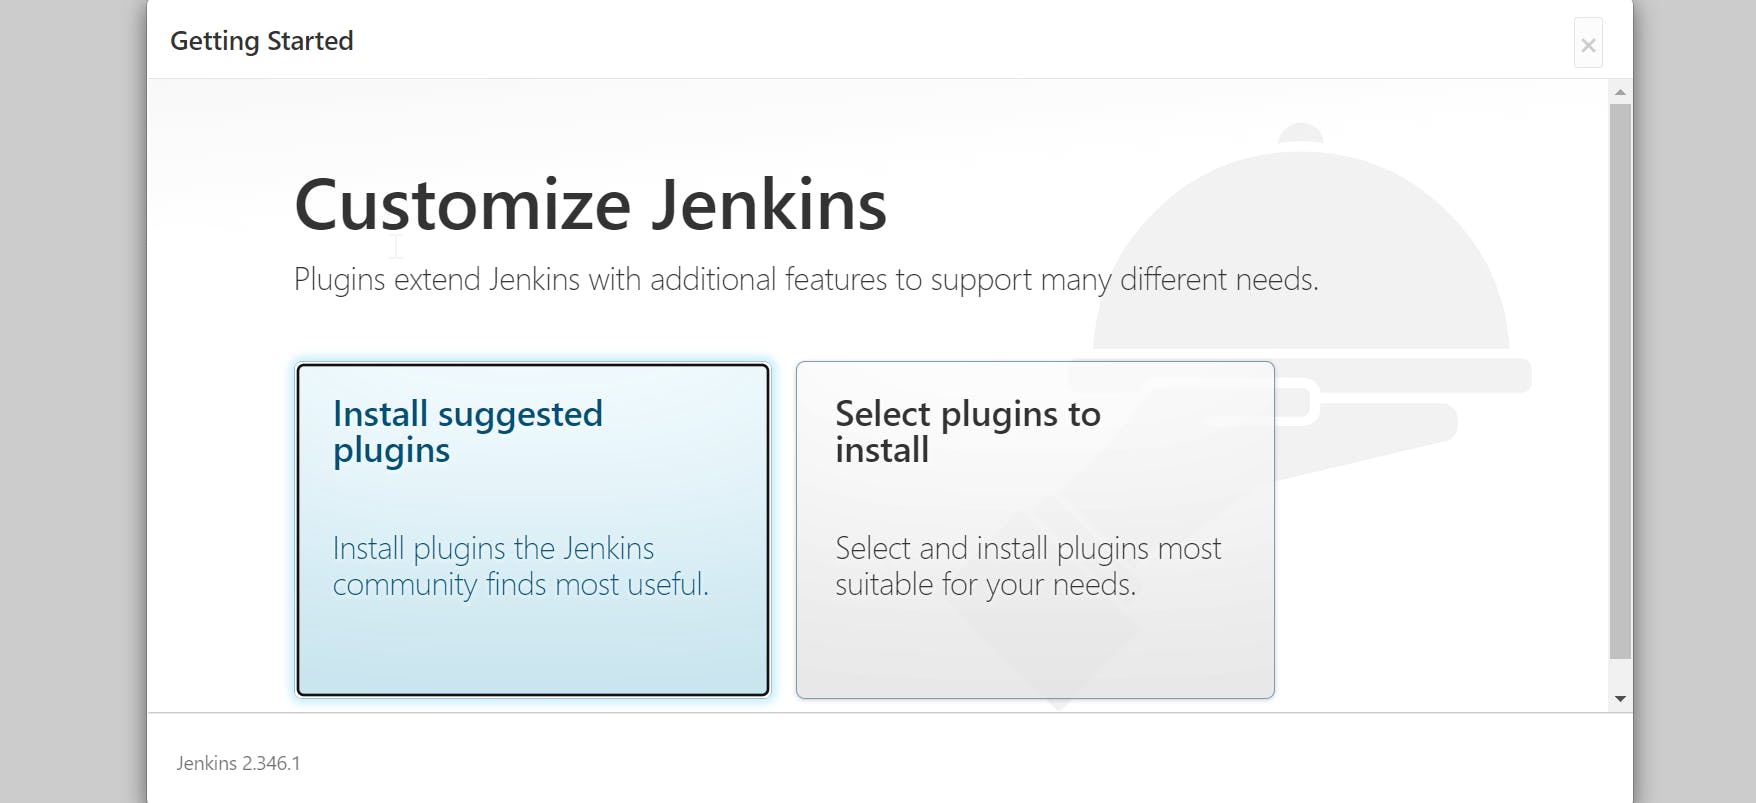
install the suggested plugins and wait for the download to finish
Create a Jenkins user to continue and remember the credentials used.
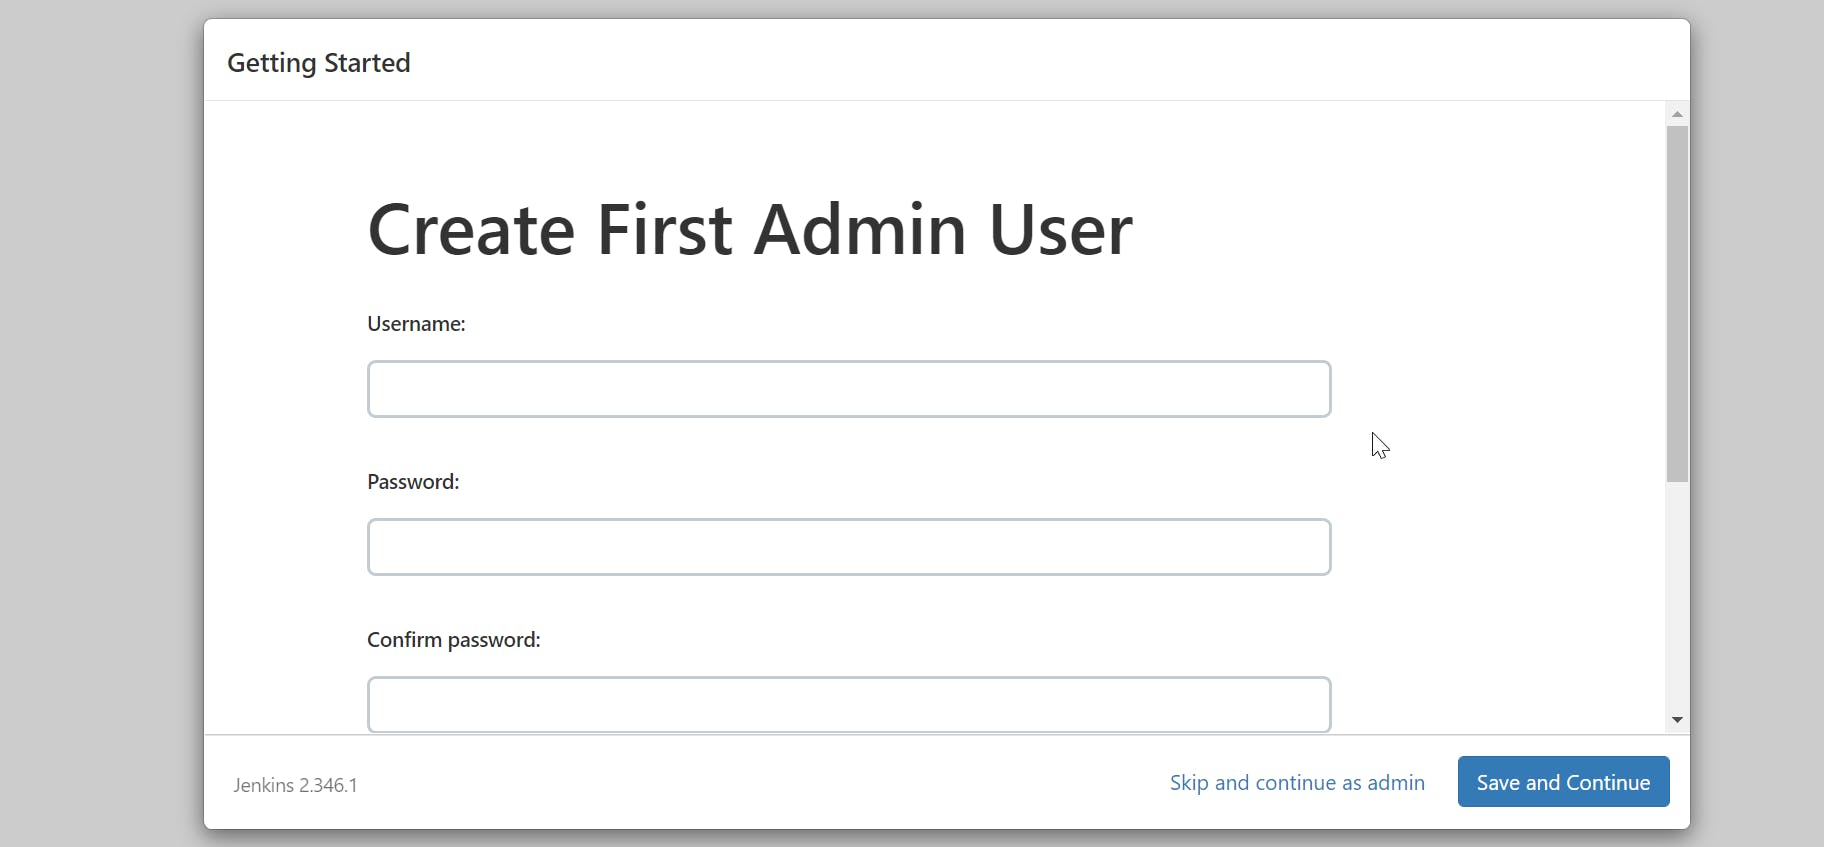 You have successfully installed Jenkins 🚀🚀🚀
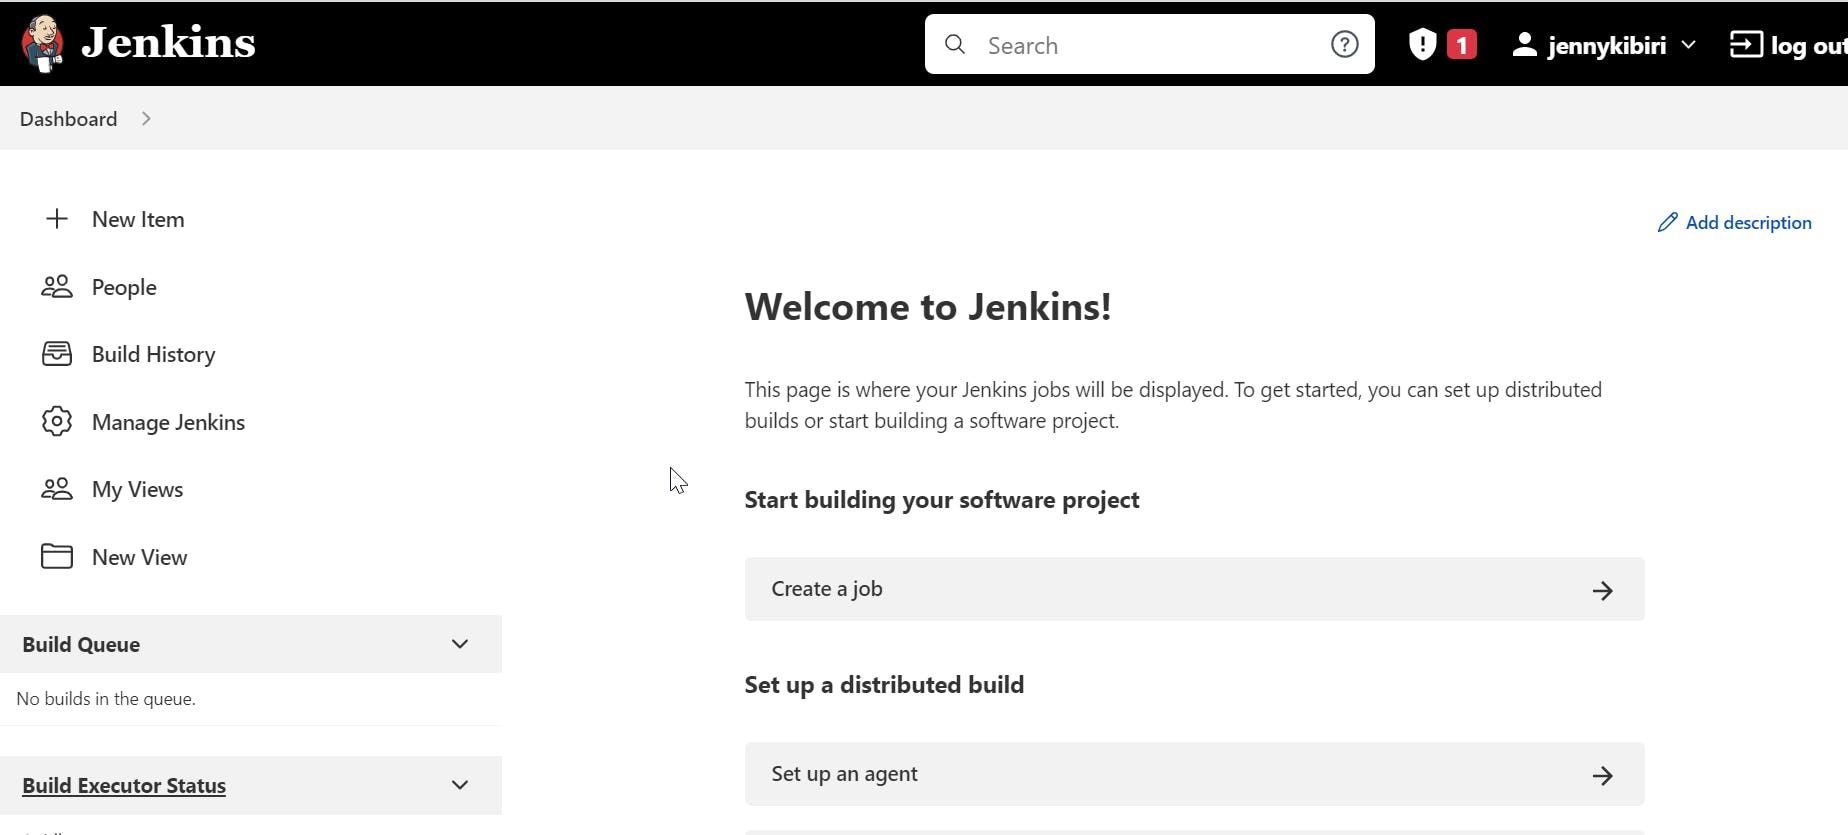
Step2: Create a pipeline job for our application on Jenkins
With Jenkins installed let's configure our project to use Jenkins These are the steps for step 2:
- Create a pipeline job
- Link our GitHub project to the pipeline
- Add GitHub credentials on Jenkins
- Add Jenkins-Github-webhook on Github to allow push events to trigger builds on our Jenkins pipeline
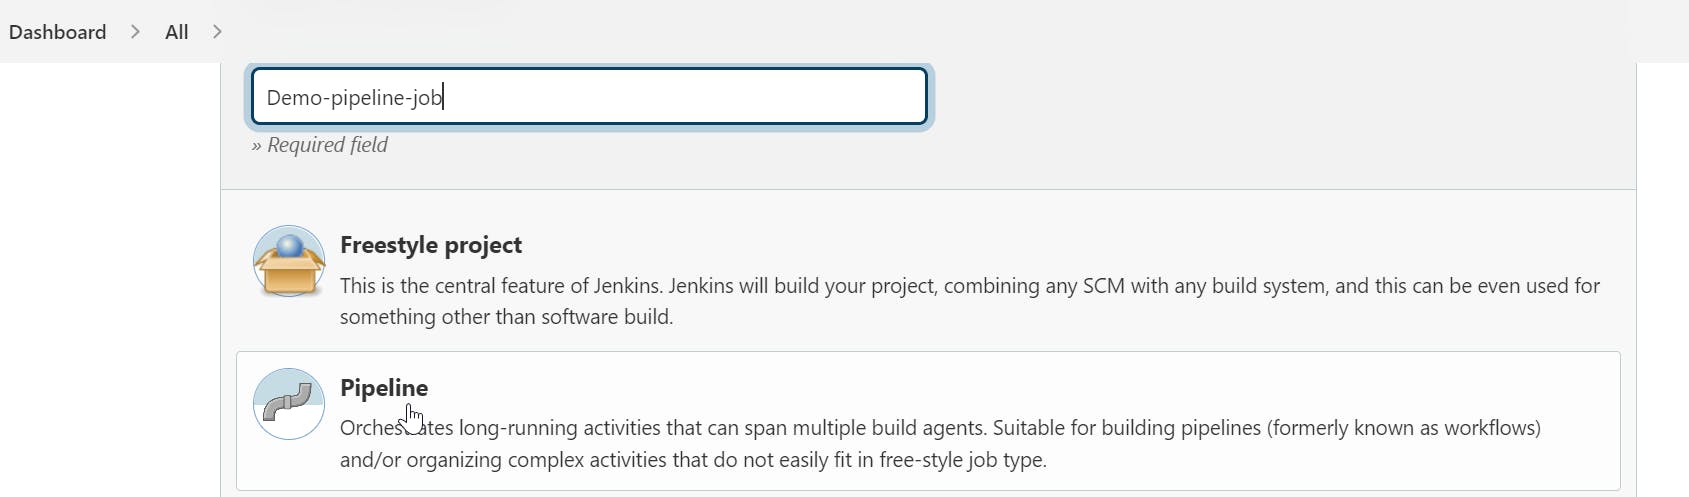
On the dashboard click on "New Item" on the Left, write a name for your pipeline, and select Pipeline
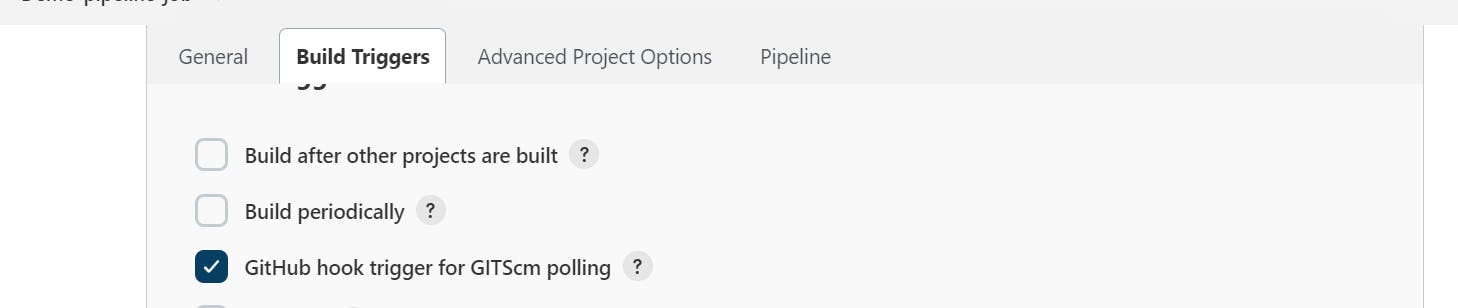
On the created pipeline you should see tabs to configure our pipeline
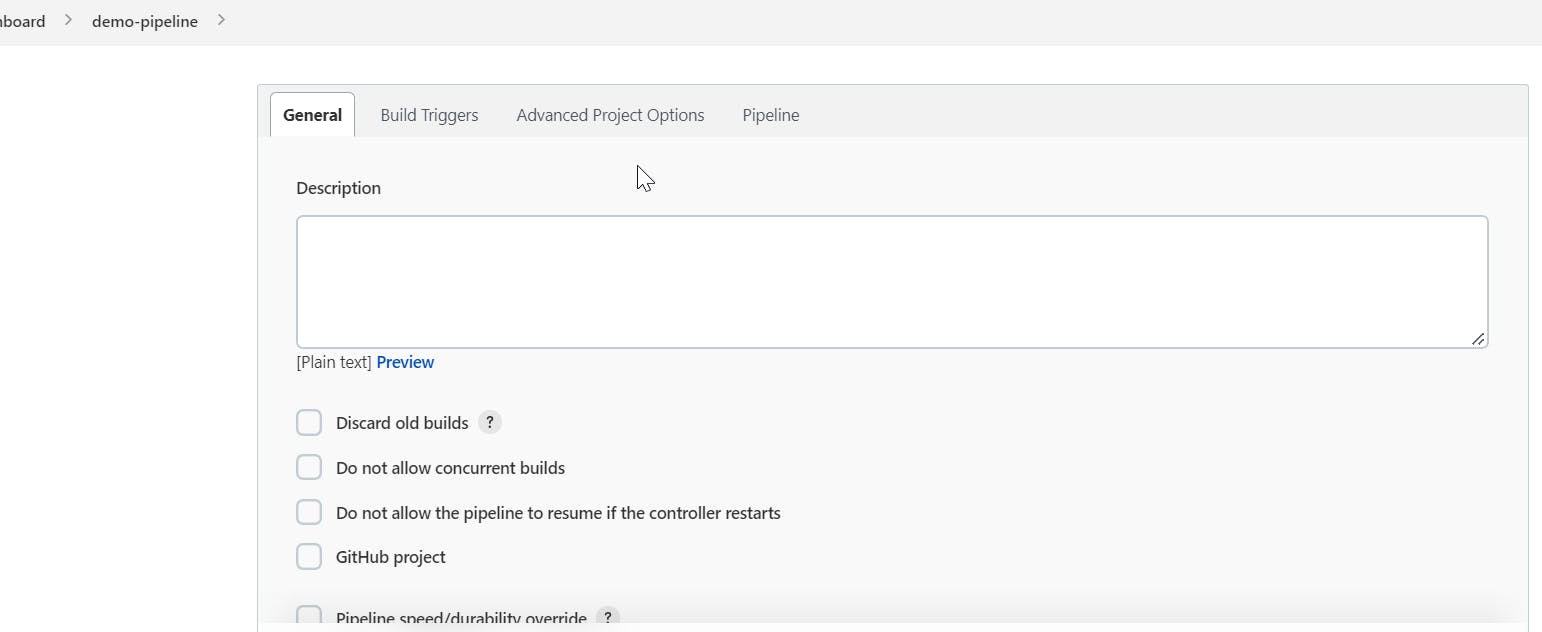
On the "Build Triggers" tab, check the "GitHub hook trigger for GITScm polling" box to allow Github push events to trigger our pipeline
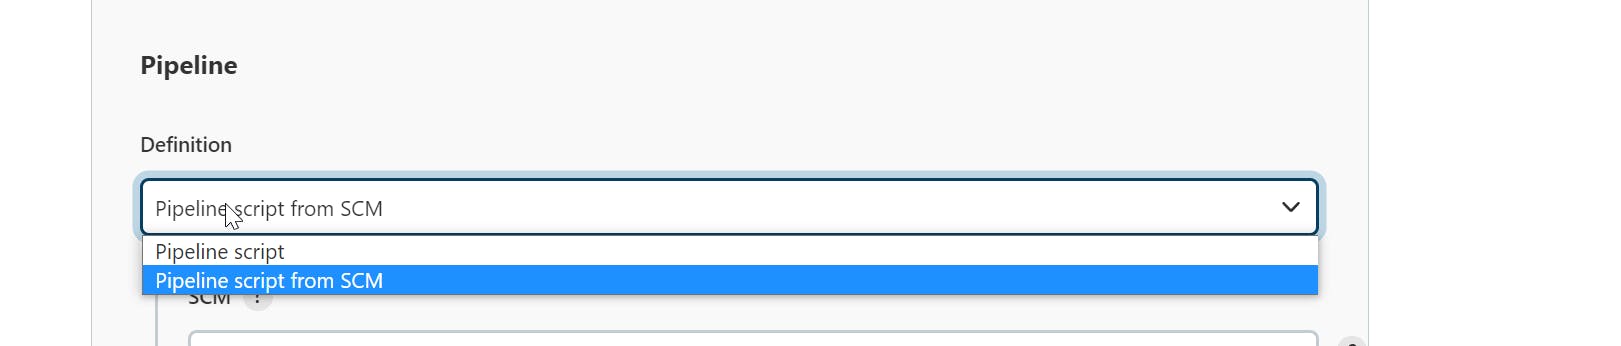
On the "Pipeline" Tab configure the following:
- Definition: Pipeline script from SCM
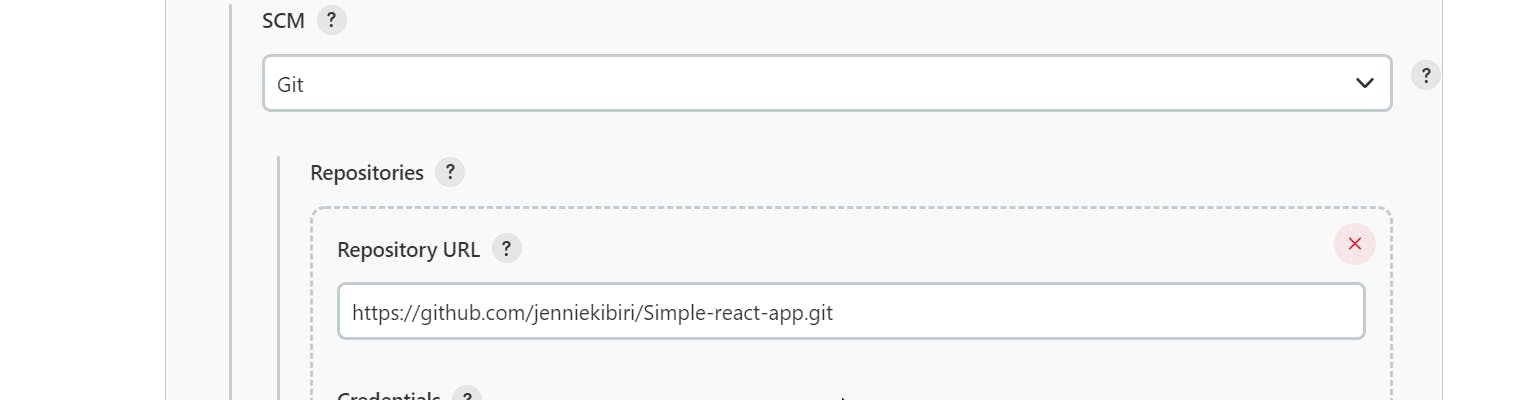
- SCM: Git
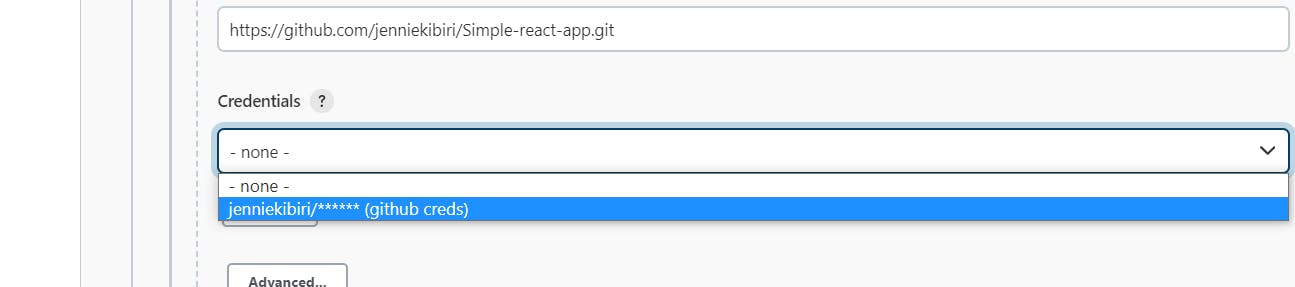
Repositories:
Credentials:
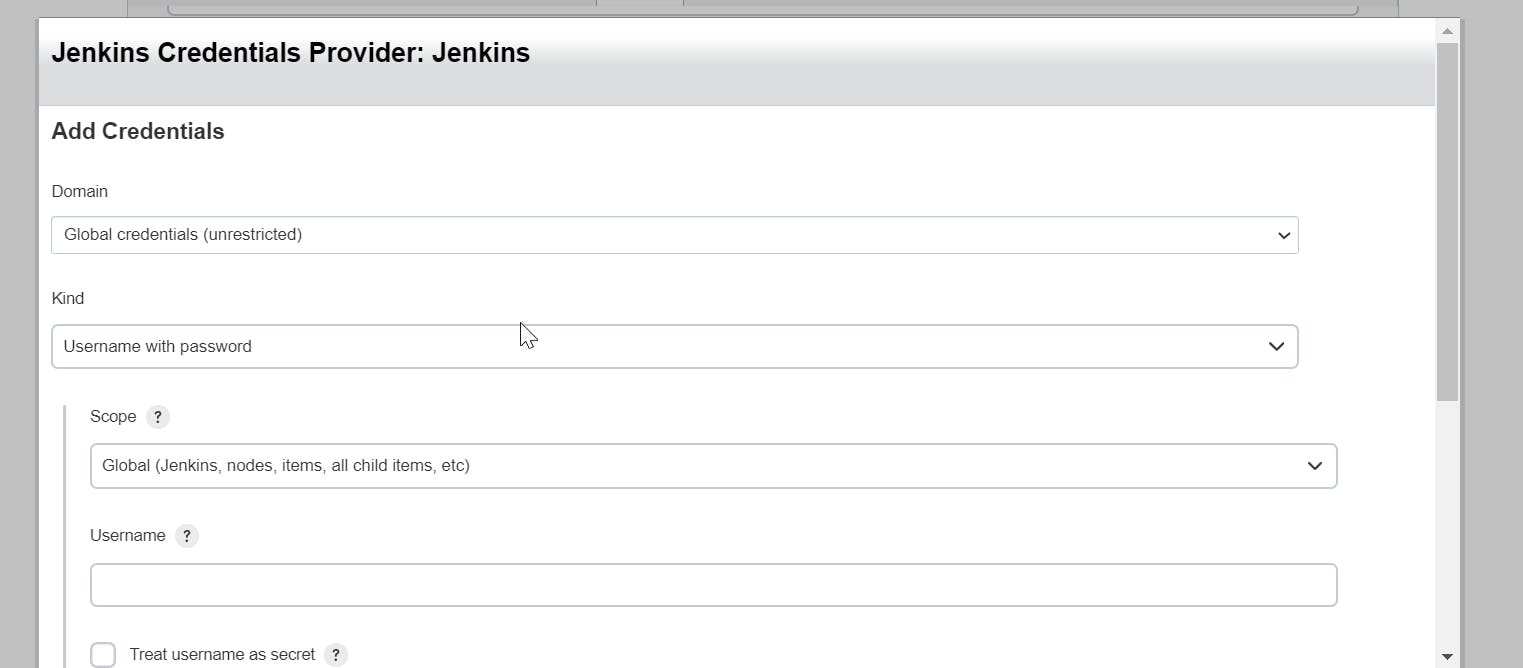
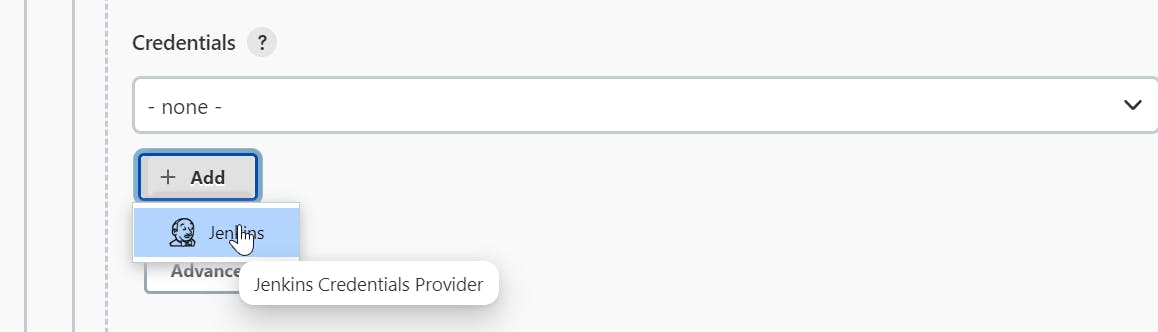 click on the "Add" button to open jenkins Credentials provider modal:
kind: username and password
- username: your github username
- password:your github password
Id: a unique identifier for the credentials Click "Add" and select the created credentials
Branches to build: */master

- Script Path: Jenkinsfile

Add the Jenkins-Github-webhook on github:
- Go to your GitHub account.
- Now, go to the “Settings” option on the right corner of your project;
- under code and automation select "webhooks"
- Append the “/github-webhook/” at the end of the URL as shown on the image below
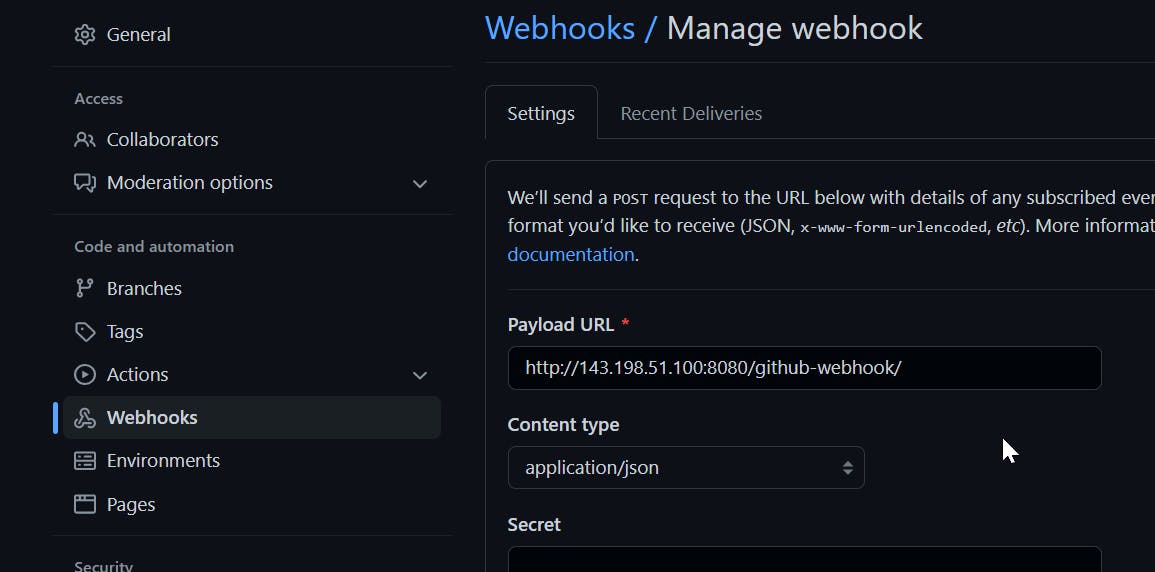
- Select the “Content-type” to “application/json” format.
Next, check one option under “Which events would you like to trigger this webhook?“. "Just the Push Event": It will only send data when someone push into the repository.
click on the “Add Webhook” button to save Jenkins GitHub Webhook configurations.

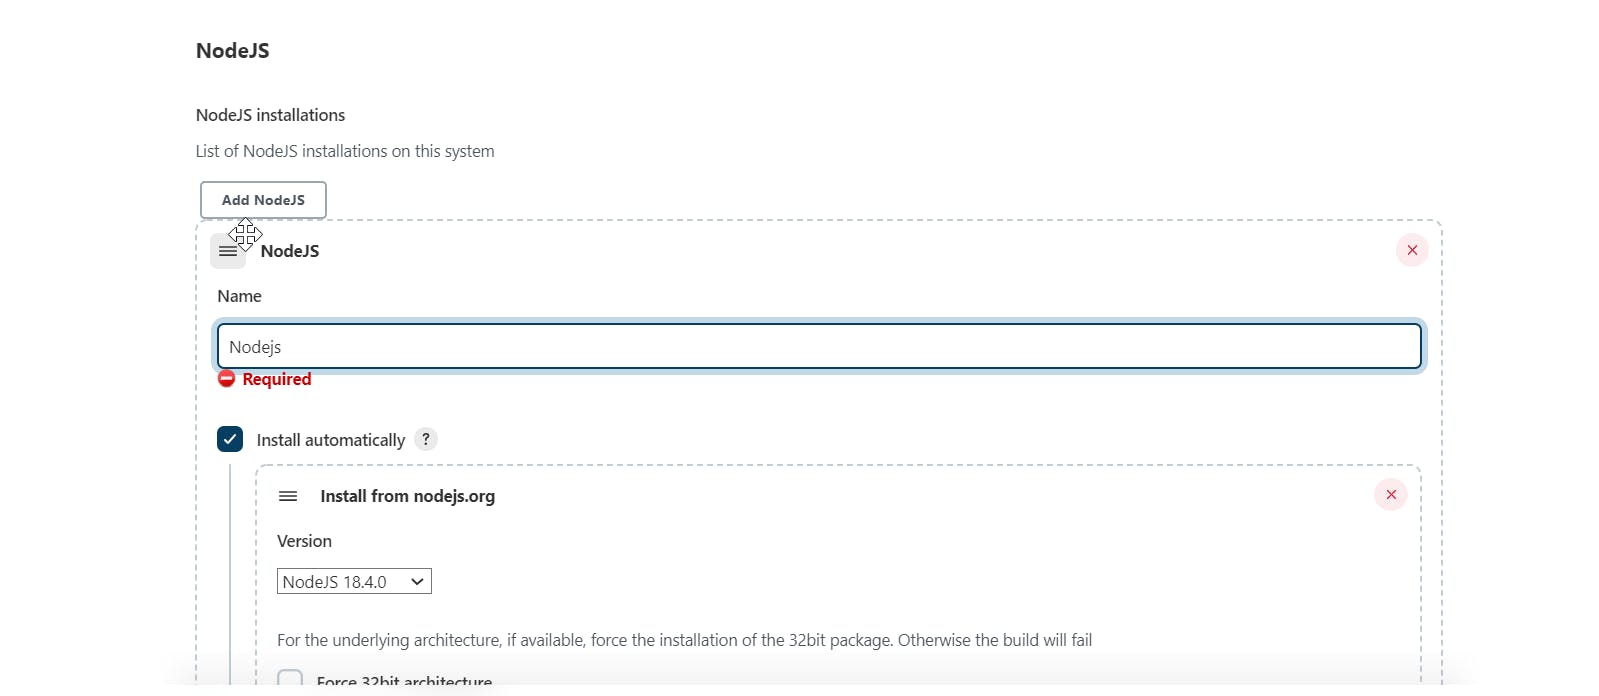
Step3: Install Nodejs/npm in Jenkins server
To Build a react application we need to install Node js and npm in Jenkins server,we have two ways of installing Nodejs in Jenkins: through Jenkins Plugins or directly in the Jenkins container: For this article let's install using the Jenkins plugin Manager:
- On Jenkins dashboard go to manage Jenkins
- Now, go to the “ Manage plugins” option on the right;
on the Plugin Manager page click on the "Available" tab and search for nodejs
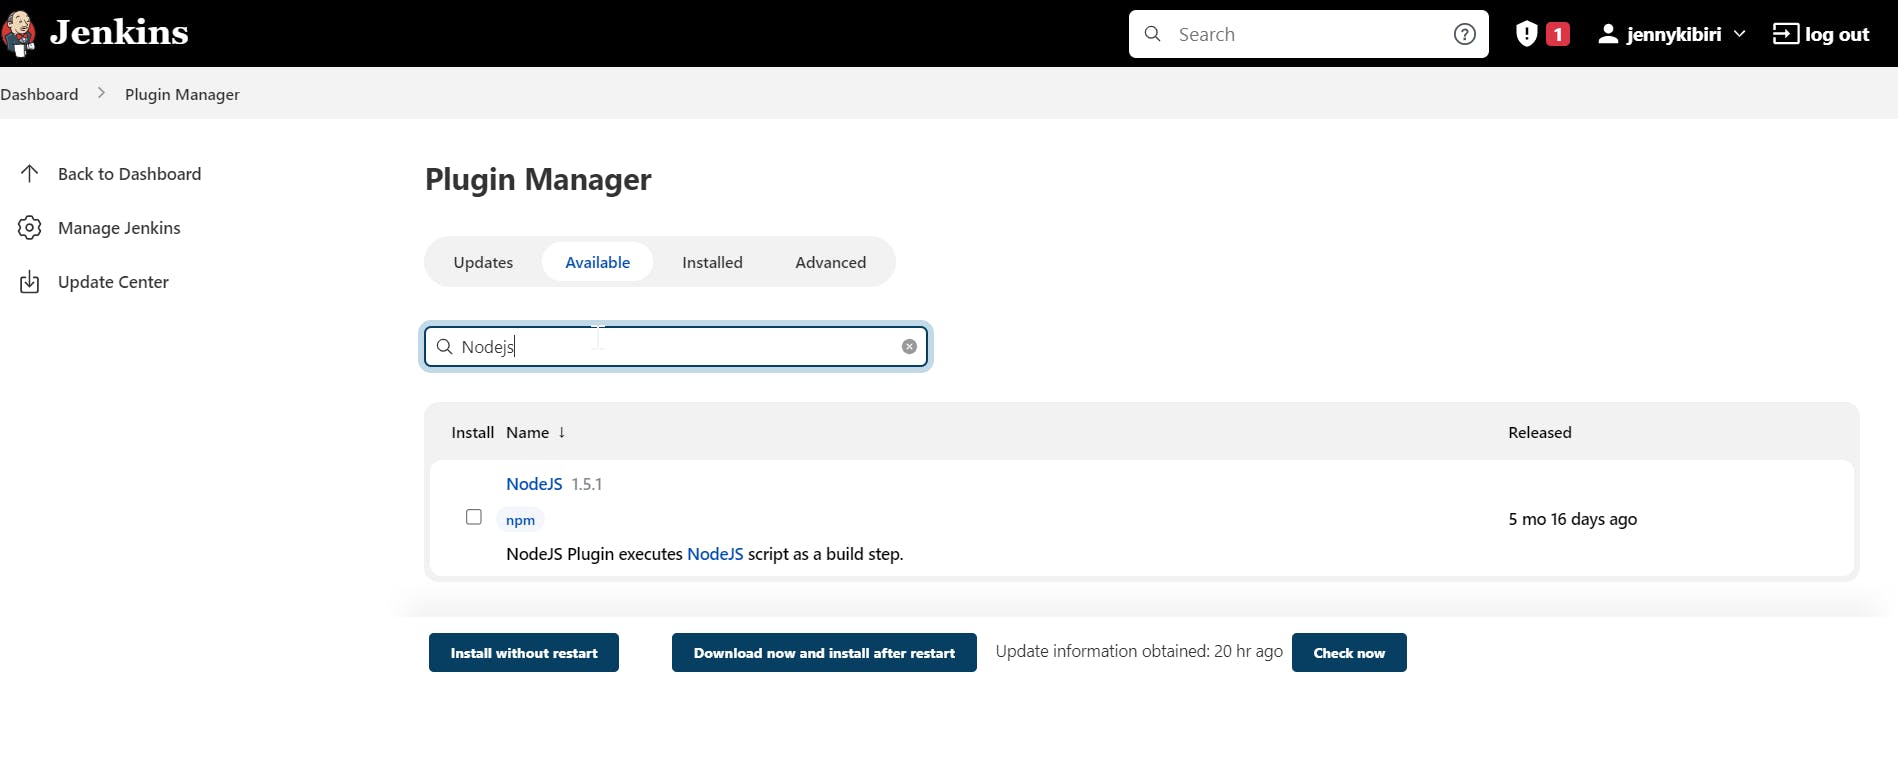
select Nodejs and install without restart.
- finally go to "Global Tool Configuration" on manage Jenkins and scroll down to Nodejs installer and click on "add Nodejs"
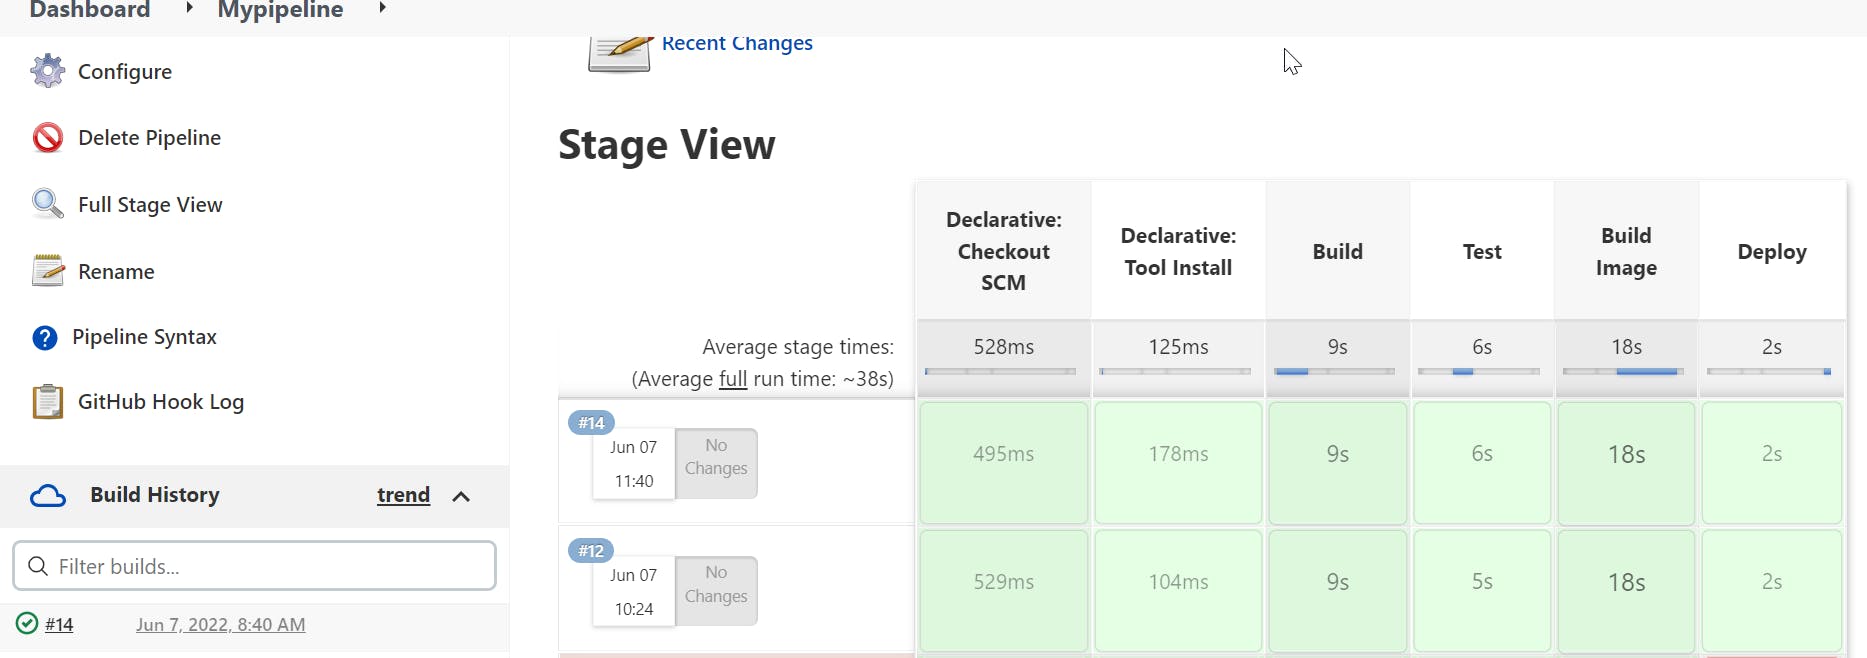
Step4: Write a Jenkinsfile for our application
a Jenkinsfile is a text file that contains the definition of a Jenkins Pipeline and is checked into source control.
Below is a basic four-stage continuous delivery pipeline, that builds, test, builds, and publish an image to Docker hub and deploy it to an EC2 instance.
pipeline {
    agent any
    tools {
        nodejs 'nodejs'
    }
    parameters {
        choice(name:'VERSION', choices:['1.0', '1.1', '1.2'], description:'Choose the version of the project')

        booleanParam(name :'executeTests', description:'Execute the tests', defaultValue:false)
    }

    stages {
        stage('Build') {
            steps {
                sh 'npm install'
                // sh 'npm run build'
            }
        }
        stage('Test') {
            steps {
                // sh 'npm run test'
                echo "Test"

            }
        }
        stage('Build Image') {
            steps {
                withCredentials([usernamePassword(credentialsId: 'docker-hub-repo', passwordVariable: 'PASS', usernameVariable: 'USER')]) {
                    sh 'docker build -t jennykibiri/sample-react-app .'
                    sh "echo $PASS | docker login -u $USER --password-stdin"
                    sh 'docker push jennykibiri/sample-react-app'
                }
            }
        }
        stage ('Deploy') {
            steps {
                script {
                    def dockerCmd = 'docker run  -p 3000:3000 -d jennykibiri/sample-react-app:latest'
                    sshagent(['ec2-server-key']) {
                        sh "ssh -o StrictHostKeyChecking=no ec2-user@3.92.144.96 ${dockerCmd}"
                    }
                }
            }
        }
    }
}
Let's discuss the Jenkins file:
In the Declarative pipeline, the Jenkinsfile start with a pipeline block (Mandatory)
Inside the pipeline block, we have agent block (Mandatory) and stages block (Mandatory)
- agent block is used to tell Jenkins where to execute this Job.
- stage block is used to group the set of tasks
- steps block is used to group the step
In the stages we have :
Build: Typically this stage of the Pipeline will be where source code is assembled, compiled, or packaged.
Test: This stage includes running automated which is a crucial component of any successful continuous delivery
Build Image: Builds an image and Publishes it to an image repo such as docker hub
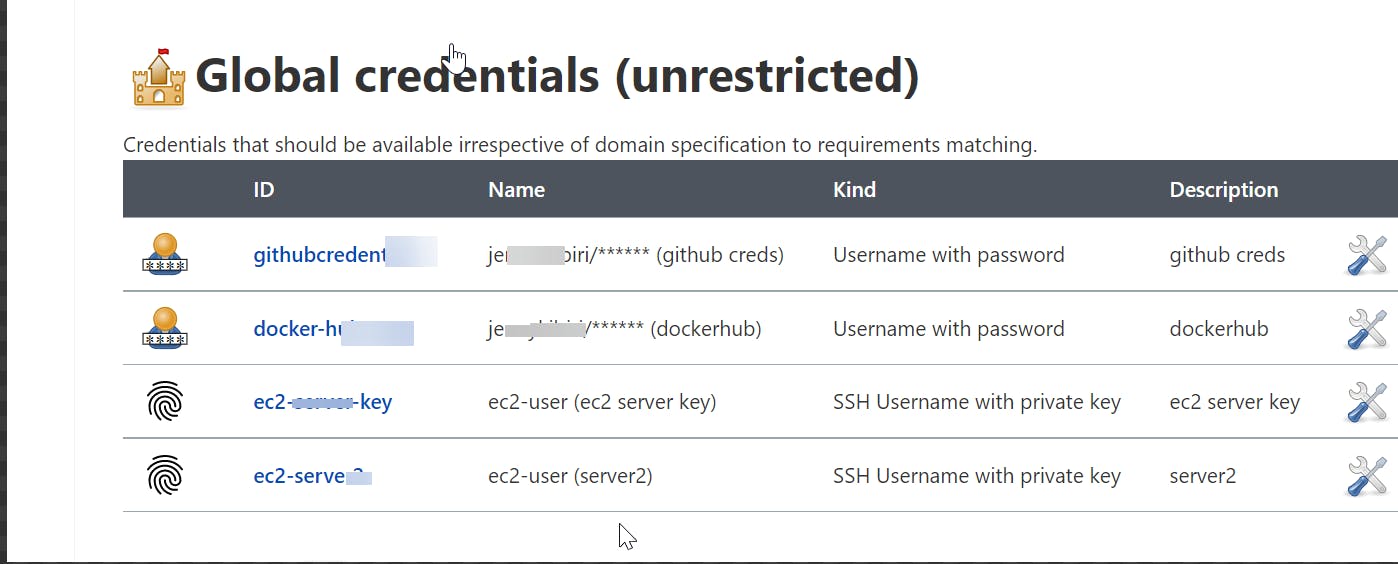
Setting credentials for docker hub
- Go to Jenkins dashboard, "Manage Jenkins", on the "security" section click on "manage credentials"
- on "Stores scoped to Jenkins" click on "Jenkins" then click on "Global credentials (unrestricted)"
- on the left click on "add credentials" which will open a modal.
- on kind select: "username and password" and fill in the required fields for your docker hub credentials
- save and use the credentials in the Jenkinsfile
- on the global credentials you should see the added credentials
Deploy: This stage publishes an image to a production environment/server
This step assumes you have already created an ec2 instance on AWS
setting credentials for ec2 instance
- Go to Jenkins dashboard, "Manage Jenkins", on the "security" section click on "manage credentials"
- on "Stores scoped to Jenkins" click on "Jenkins" then click on "Global credentials (unrestricted)"
- on the left click on "add credentials" which will open a modal.
- on kind select: "SSH Username with private key" and fill in the required fields for the ec2 instance for the user name use "ec2-user"
copy your private key in the key section.
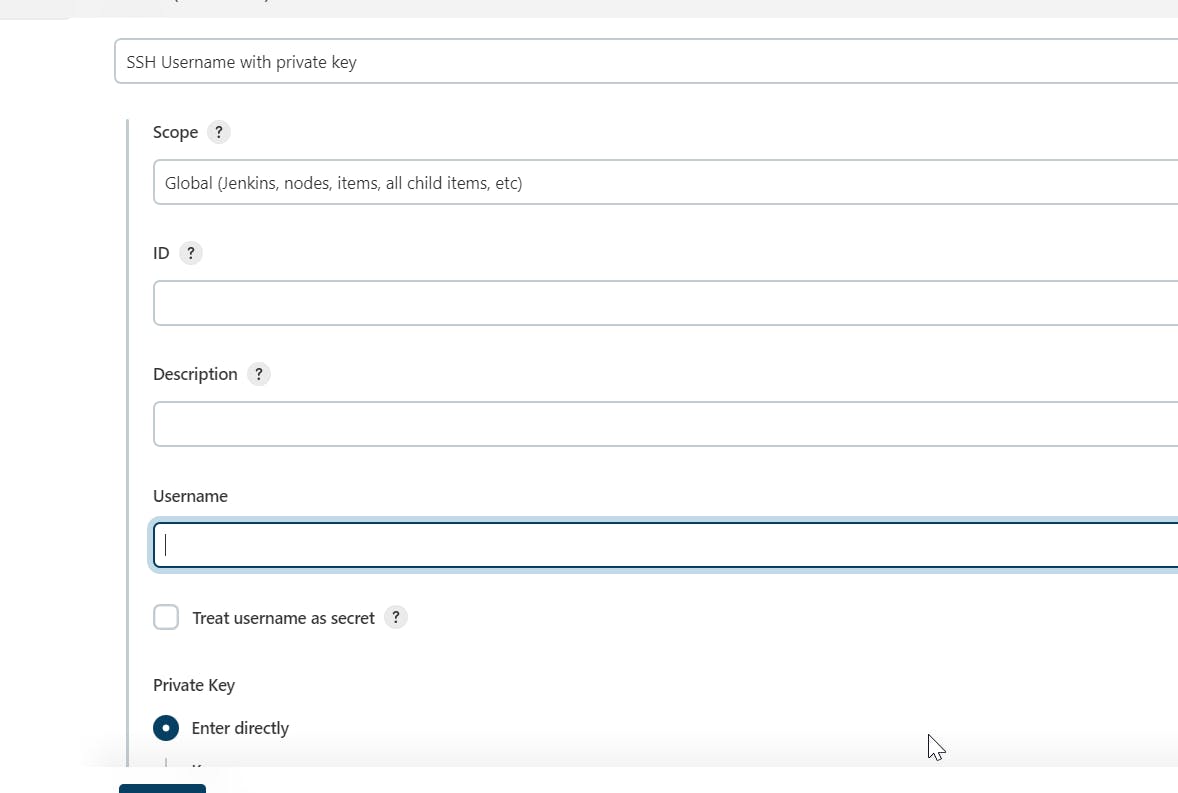
save and use the credentials in the Jenkinsfile
Now push you code to Github which should trigger a pipeline build on Jenkins:
🎉🎉🎉 Successfully we have implemented a Pipeline using Jenkins for containerizing and deploying our app.